Introduction
A comprehensive collection of demos covering the various topics required for AZ-104 Microsoft Azure Administrator certification exam.
Search by typing S on your keyboard, or use search icon (🔍) at the top.
Active Directory
Access Review
Following the Prerequisites for the creating access reviews:
Prerequisites:
- Azure AD Premium P2.
- Global administrator, User administrator, or Identity Governance administrator to create reviews on groups or applications.
- Global administrators and Privileged Role administrators can create reviews on role-assignable groups. For more information, see Use Azure AD groups to manage role assignments.
- (Preview) Microsoft 365 and Security group owner.
Needless to say, Guest accounts are not allowed to perform access reviews.
Use the demo to test every scenario.
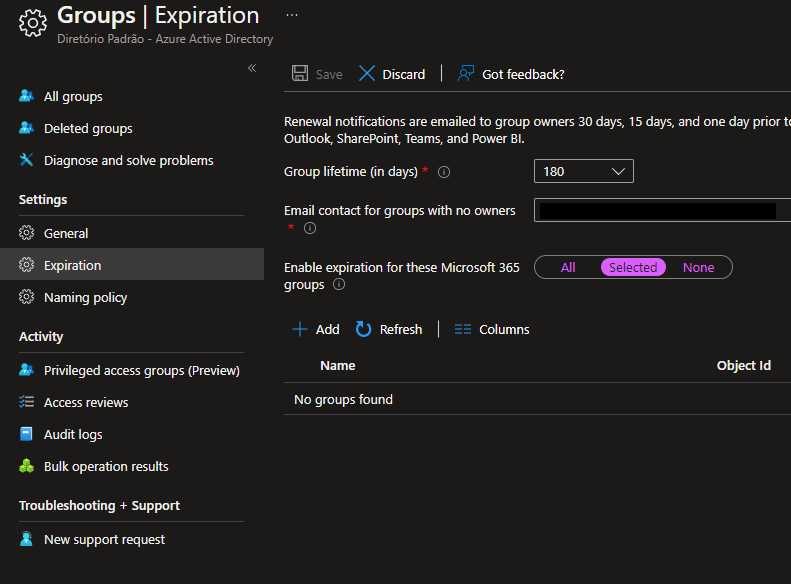
Groups with automatic deletion
Requires Azure AD Premium
As demonstrated in the documentation, only Microsoft 365 groups can be associated for the expiration policy.
As stated in the tool tip:
Expiration will only be applied to Microsoft 365 groups
You can try out in this demo with various groups created.
New Tenant User Management
Existing AAD admins (Global Administrators, User Administrators, Owners) of an existing Tenant A must be added to a newly created Tenant B before they’re able to manage users of that new Tenant B. The only user which will have instant management permissions is the administrator that created the new Tenant B.
Reference: Add Users to Active Directory
As we can see in this example, none of the existing users of Tenant A are added to the new Tenant B upon it’s creation, with the exception of the Tenant B creator.
App Services
App and Plan need to be on same location
You cannot create a Web App in a location different from the Plan location.
az appservice plan create -g 'rg-az104' -n 'plan-az104' -l 'brazilsouth'

# There is no "location" argument, it must always follow the plan
az webapp create -g 'rg-az104' -p 'plan-az104' -n 'app-az104' -l 'eastus2'
Automation
Manage VMs
To manage the consistency of Virtual Machines with Automation State Configuration, the following steps are executed.
Considering that the VMs are already onboarded into the Automation Account:
- Upload a configuration to Automation Account in the blade State Configuration (DSC)
- Compile the configuration and add it to a node (VM)
- Check the compliance status
Demonstration
Create the resorces
az automation account create --automation-account-name 'aa-az104' -g 'rg-az104'
az vm create -n 'az-104' -g 'rg-az104' --image UbuntuLTS
Run the configuration manually as in the official tutorial.
Container Instances
Container Instances: Storage integration
This example demonstrate permissions for Container Instances to access Storage accounts.
There are two modes demonstrated here:
- Service Principal - To reduce the amount of credentials needed
- SAS Token - To restrict the time allowed for access via expiration dates
Create the resources:
terraform init
terraform apply -auto-approve
Upload the test blob to the container:
az storage blob upload -f 'file.txt' -c 'blobs' --account-name 'stawsomeaz104'
Generate the SAS token:
end=`date -u -d "60 minutes" '+%Y-%m-%dT%H:%MZ'`

az storage account generate-sas --permissions 'acdfilprrtuwxy' --account-name 'stawsomeaz104' --services 'b' --resource-types 'sco' --expiry $end -o tsv
Add values to the .env file.
Start the server:
npm install
npm start
Local testing:
curl http://localhost:3000/api/sastoken
curl http://localhost:3000/api/managedidentity
Container Registries
Push Images to ACR
Assuming you have a local image build, how would you go about pushing it to ACR?
az acr create -n 'acrawsomeaz104' -g 'rg-az104' --sku 'Basic'
Build the sample image:
docker build -t alpine-mysqlclient .
To trigger a build and push it to ACR:
az acr build \
  --image 'alpine-mysqlclient' \
  --registry 'acrawsomeaz104' \
  --file Dockerfile .
You can also push a local image directly to ACR with docker push but you’ll have to login to ACR beforehand using docker login.
Kubernetes Services (AKS)
Grant access to AKS
As documented in Kubernetes Authentication Strategies:
Kubernetes uses client certificates, bearer tokens, or an authenticating proxy to authenticate API requests through authentication plugins.
And, as per Microsoft Access and Identity docs:
You can authenticate, authorize, secure, and control access to Kubernetes clusters in a variety of ways.
- Using Kubernetes role-based access control (Kubernetes RBAC), you can grant users, groups, and service accounts access to only the > resources they need.
- With Azure Kubernetes Service (AKS), you can further enhance the security and permissions structure via Azure Active Directory and > Azure RBAC.
As we can see there are many options to grant access in AKS. Let’s look into some examples below.
Demo
For a hands-on experience, run the demo to create your environment and test these scenarios.
RBAC
You can manage access using AKS RBAC. This feature needs Managed AAD to be enabled in the AKS, along with enabling the RBAC feature itself.
az aks create -g 'MyResourceGroup' -n 'MyManagedCluster' --enable-aad --enable-azure-rbac
This has the advantage of granular permissions, such as applying different permissions to specific namespaces.
There are also some limitations to this approach, make sure to check the documentation.
AAD Application Registration
Another form of authorization in Kubernetes is by creating an Application Registration on AAD and assigning permissions to that application to the AKS resource via IAM.
Although this works in practice, it is far less recommended to provide this tot end-users, and an RBAC approach would be much appropriate.
Snippet from the docs:
kubectl config set-credentials USER_NAME \
   --auth-provider=oidc \
   --auth-provider-arg=idp-issuer-url=( issuer url ) \
   --auth-provider-arg=client-id=( your client id ) \
   --auth-provider-arg=client-secret=( your client secret ) \
   --auth-provider-arg=refresh-token=( your refresh token ) \
   --auth-provider-arg=idp-certificate-authority=( path to your ca certificate ) \
   --auth-provider-arg=id-token=( your id_token )
OIDC
Azure Kubernetes Services also can act as a OIDC issuer, which at the time of this writing is in Preview.
To see that running alongside Azure Workload Identity, checkout my other repository.
Load Balancer
Balance to Network Virtual Appliance (NVA)
HA Ports allow the LB to drop the ports and protocols requirements for balancing rules, forwarding all ports and protocols to the destination
Floating IP =
enabledmeans that the request will have the IP and Port replaced with LB name and port. Ifdisabled(default), the IP and Ports will correspond to the destination.
To load balancer request for a Network Virtual appliance, HA ports are required:
- Internal-only
- Standard SKU
Must Internal + Standard to enable HA Ports.
And Floating IP must be enabled when creating the rule, so in case of multiple services responding to the same Port.
az network lb create -g 'rg-az104' -n 'lb-az104-standard' --sku 'Standard' --private-ip-address '10.0.0.x'
Load Balancer Least Privilege Permissions
For an administrator to be able to create Backend Pools on ELBs and Health Probes on ILBs the minimum permission that they’ll need is Network Contributor on those resources AND in the Virtual Network.
The reason being that a change on the subnet is also required, as demonstrated in the following exception.
Message: The client 'Admin1@yourdomain.onmicrosoft.com' with object id '00000' has permission to perform action 'Microsoft.Network/loadBalancers/write' on scope '/subscriptions/00000/resourceGroups/rg-awsomeaz104-loadbalancer-permissions-demo/providers/Microsoft.Network/loadBalancers/lbi-awsomeaz104-loadbalancer-permissions-demo'; however, it does not have permission to perform action 'Microsoft.Network/virtualNetworks/subnets/join/action' on the linked scope(s) '/subscriptions/00000/resourceGroups/rg-awsomeaz104-loadbalancer-permissions-demo/providers/Microsoft.Network/virtualNetworks/vnet-awsomeaz104-loadbalancer-permissions-demo/subnets/LBI-Subnet' or the linked scope(s) are invalid.
In the experiment the following output was reproduced, this of course given that the Virtual Network resides on the same Resource Group.
| Target | Assignment | Scope | Action | Result | Least Privilege |
|---|---|---|---|---|---|
| ELB | Contributor | External Load Balancer | Add Backend Pool | ❌ | ❌ |
| ELB | Network Contributor | External Load Balancer | Add Backend Pool | ❌ | ❌ |
| ELB | Network Contributor | Resource Group | Add Backend Pool | ✅ | ✅ |
| ELB | Owner | External Load Balancer | Add Backend Pool | ❌ | ❌ |
| ILB | Contributor | Internal Load Balancer | Add Health Probe | ❌ | ❌ |
| ILB | Network Contributor | Internal Load Balancer | Add Health Probe | ❌ | ❌ |
| ILB | Network Contributor | Resource Group | Add Health Probe | ✅ | ✅ |
| ILB | Owner | Internal Load Balancer | Add Health Probe | ❌ | ❌ |
Log Analytics
Location Independence
This example demonstrate a Log Analytics workspace being attached to resources that are not part of the same location.
Create the base resources:
az group create -n 'rg-az104' -l 'brazilsouth'
az storage account create -n 'stawsomeaz104' -g 'rg-az104' -l 'brazilsouth'
az backup vault create -l 'brazilsouth' --name 'rsv-az104' -g 'rg-az104'

az monitor log-analytics workspace create -g 'rg-az104' -n 'log-az104' -l 'eastus2'
Add the RSV from one location to a Log Analytics Workspace from another location:
id=$(az backup vault show -n 'rsv-az104' -g 'rg-az104' --query id -o tsv)

az monitor diagnostic-settings create --resource $id -n 'rsv-reports' \
  --storage-account 'stawsomeaz104' \
  --logs '[
    {
      "category": "AzureBackupReport",
      "enabled": true,
      "retentionPolicy": {
        "enabled": false,
        "days": 0
      }
    }
  ]'
Management Groups
Management Groups Permissions
For hands-on on these topics run the demo.
Policy Inheritance
Policies applied to Management Groups and inherited by Subscriptions.
Let’s consider the following configuration:
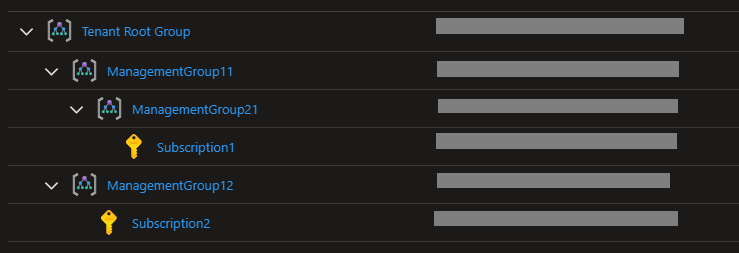
And the following policies applied:
| Policy | Resource | Applied To |
|---|---|---|
| Not Allowed Resources Types | Virtual Networks | Tenant Root Group |
| Allowed Resources Types | Virtual Networks | ManagementGroup12 |
These operations are not allowed:
- Create a Virtual Network in Subscription1
- Create a Virtual Machine in Subscription2
Adding Subscriptions
It is not possible to add subscription to more than one management group.
For example, giving the same scenario above, this command would fail:
az account management-group subscription add -n '<management-group-11>' -s 'Subscription1'
Monitor
Create Alert for VM
Create the base resources:
az group create -n 'rg-az104' -l 'brazilsouth'

az storage account create -n 'stawsomeaz104' -g 'rg-az104' -l 'brazilsouth'

az vm create \
  -g 'rg-az104' \
  -n'vm-az104' \
  --image 'Win2022Datacenter' \
  --public-ip-sku 'Standard' \
  --admin-username 'azureuser' \
  --admin-password 'SecretPassAz104!' \
  --enable-agent

az monitor log-analytics workspace create -g 'rg-az104' -n 'log-az104' -l 'eastus2'
- Configure Guest-Level monitoring in the VM via the Portal.
- Enable Log Analytics in the VM (via Diagnostic Settings)
- Add “System” in Log Analytics in the Agent Manager blade. MicrosoftMonitoringAgent should be already installed in the image. (You DO NOT “add” the agent from the Marketplace. It is installed)
You can now create a custom Alert in Azure Monitor.
Virtual Networks
Application Security Group
Granted you have a VM and an NSG, how to apply an Application Security Group?
az vm create -n 'vm-az104' -g 'rg-az104' --image 'UbuntuLTS'

az network asg create -g 'rg-az104' -n 'asg-az104'
The ASG is applied directly to the NIC:
az network nic ip-config update -n 'ipconfigvm-az104' -g 'rg-az104' --nic-name 'vm-az104VMNic' --application-security-groups 'asg-az104'
Network Watcher
This small session demonstrates Network Watcher resources.
Create the network components:
az group create -l 'brazilsouth' -n 'rg-az104'

az network vnet create -g 'rg-az104' -n 'VNet1' --address-prefixes '10.0.0.0/16'

az network vnet subnet create -g 'rg-az104' --vnet-name 'VNet1' -n 'Subnet1' --address-prefixes '10.0.1.0/24'
az network vnet subnet create -g 'rg-az104' --vnet-name 'VNet1' -n 'Subnet2' --address-prefixes '10.0.2.0/24'

az vm create -n 'vm1' -g 'rg-az104' --image 'UbuntuLTS' --vnet-name 'VNet1' --subnet 'Subnet1'
az vm extension set -g 'rg-az104' --vm-name 'vm1' --name 'NetworkWatcherAgentLinux' --publisher 'Microsoft.Azure.NetworkWatcher'

az vm create -n 'vm2' -g 'rg-az104' --image 'UbuntuLTS' --vnet-name 'VNet1' --subnet 'Subnet2'
az vm extension set -g 'rg-az104' --vm-name 'vm2' --name 'NetworkWatcherAgentLinux' --publisher 'Microsoft.Azure.NetworkWatcher'
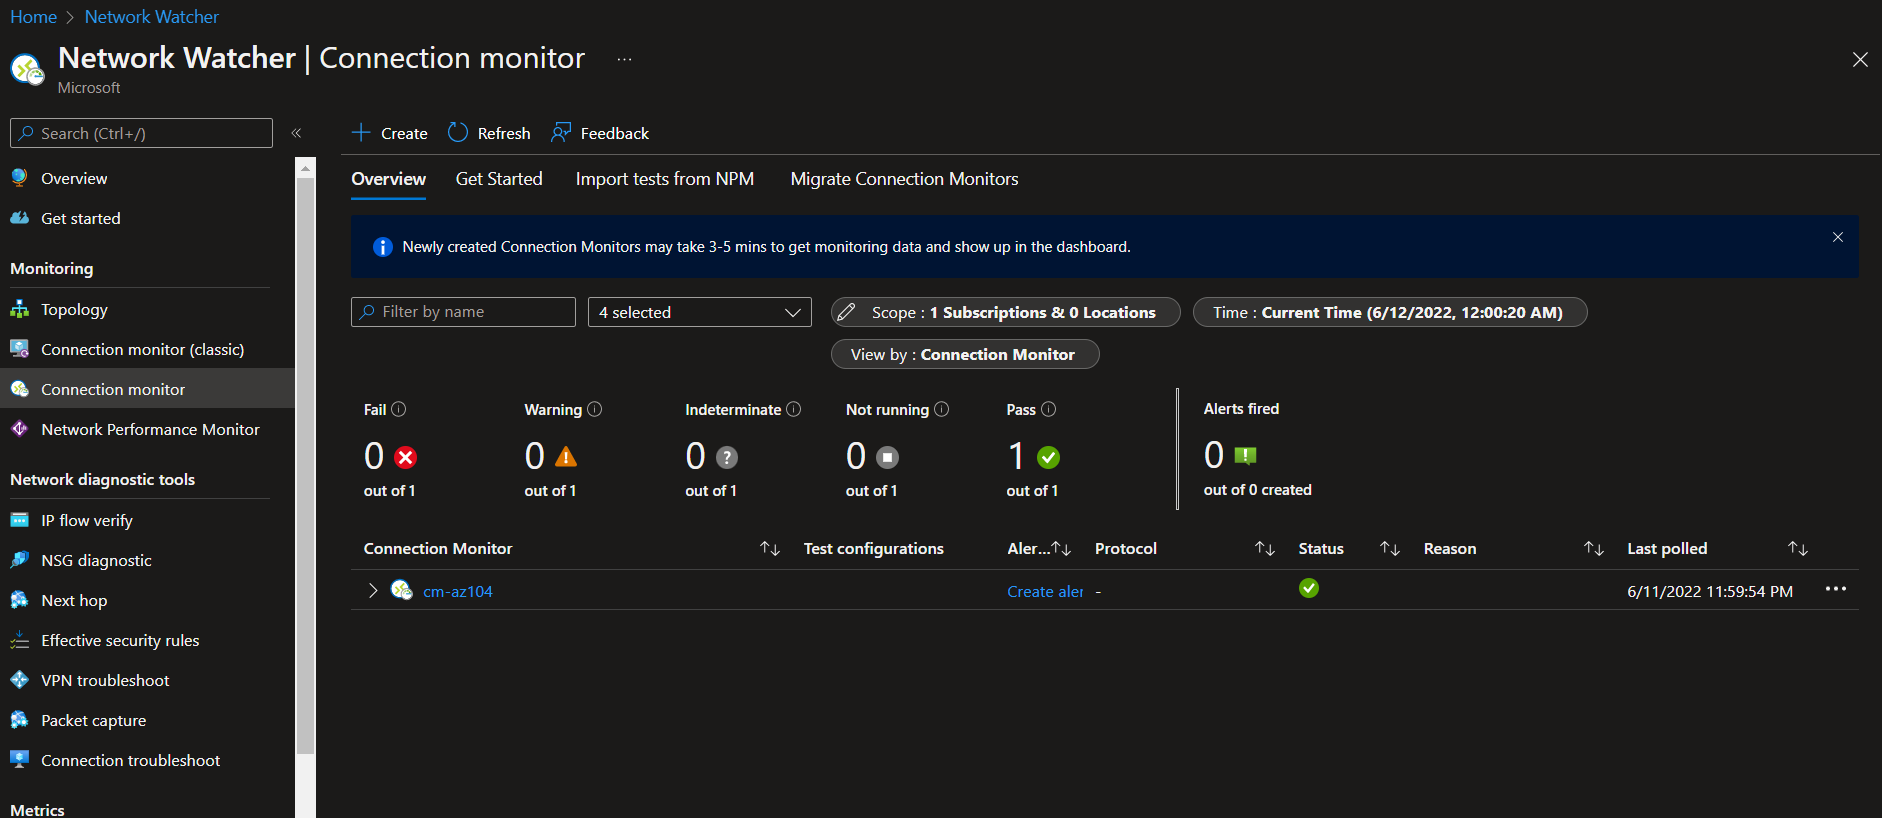
Connection Monitor
Connection monitor is a centralized health probe tool that allows you to constantly verify the state various services.
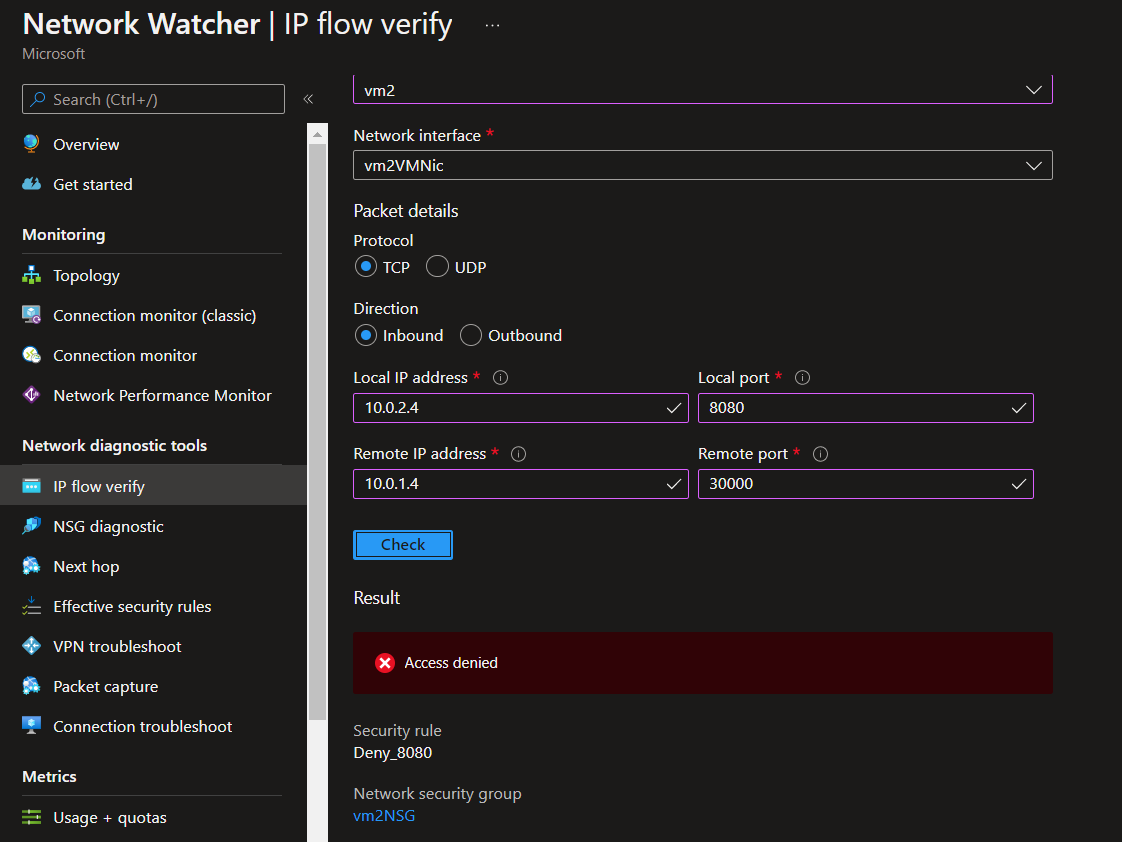
IP Flow Verify
Network Watcher IP flow verify checks if a packet is allowed or denied to or from a virtual machine based on 5-tuple information. The security group decision and the name of the rule that denied the packet is returned.
The following command for IP Flow will verify the connectivity VM1 -> VM2, from VM2 inbound perspective.
az network watcher test-ip-flow \
  -g 'rg-az104' \
  --direction 'Inbound' \
  --protocol 'TCP' \
  --local '10.0.2.4:8080' \
  --remote '10.0.1.4:30000' \
  --vm 'vm2'
Now to demonstrate a Deny rule:
az network nsg rule create -g 'rg-az104' --nsg-name 'vm2NSG' -n 'Deny_8080' --priority '100' \
  --source-address-prefixes '10.0.1.4' --source-port-ranges '*' \
  --destination-address-prefixes '10.0.2.4' --destination-port-ranges '80' '8080' --access 'Deny' \
  --protocol 'Tcp' --description 'Deny from specific IP address ranges on 80 and 8080.'
If you run IP Flow again it will fail.
az network watcher test-ip-flow -g 'rg-az104' --direction 'Inbound' --protocol 'TCP' --local '10.0.2.4:8080' --remote '10.0.1.4:30000' --vm 'vm2'

# {
#   "access": "Deny",
#   "ruleId": "/subscriptions/2ea97ae3-d129-41fb-a4ca-eb56ad392d35/resourceGroups/rg-az104/providers/Microsoft.Network/networkSecurityGroups/vm2NSG/securityRules/Deny_8080",
#   "ruleName": "securityRules/Deny_8080"
# }
Portal view:
To the delete the rule:
az network nsg rule delete -g 'rg-az104' --nsg-name 'vm2NSG' -n 'Deny_8080'
NSG Diagnostic
The Network Security Group (NSG) Diagnostics tool provides detailed information to understand and debug the security configuration of your network. For a given source-destination pair, the API returns all NSGs that will be traversed, the rules that will be applied in each NSG and the final allow/deny status for the flow.
az network watcher run-configuration-diagnostic \
  --resource 'vm2' \
  --resource-type 'virtualMachines' \
  --resource-group 'rg-az104'\
  --direction 'Inbound' \
  --protocol 'TCP' \
  --source '10.0.1.4' \
  --destination '10.0.2.4' \
  --port '8080'
View from the portal:
Next Hop
Next Hop provides the next hop from the target virtual machine to the destination IP address.
az network watcher show-next-hop -g 'rg-az104' --vm 'vm1' --source-ip '10.0.1.4' --dest-ip '10.0.2.4'
Portal view:

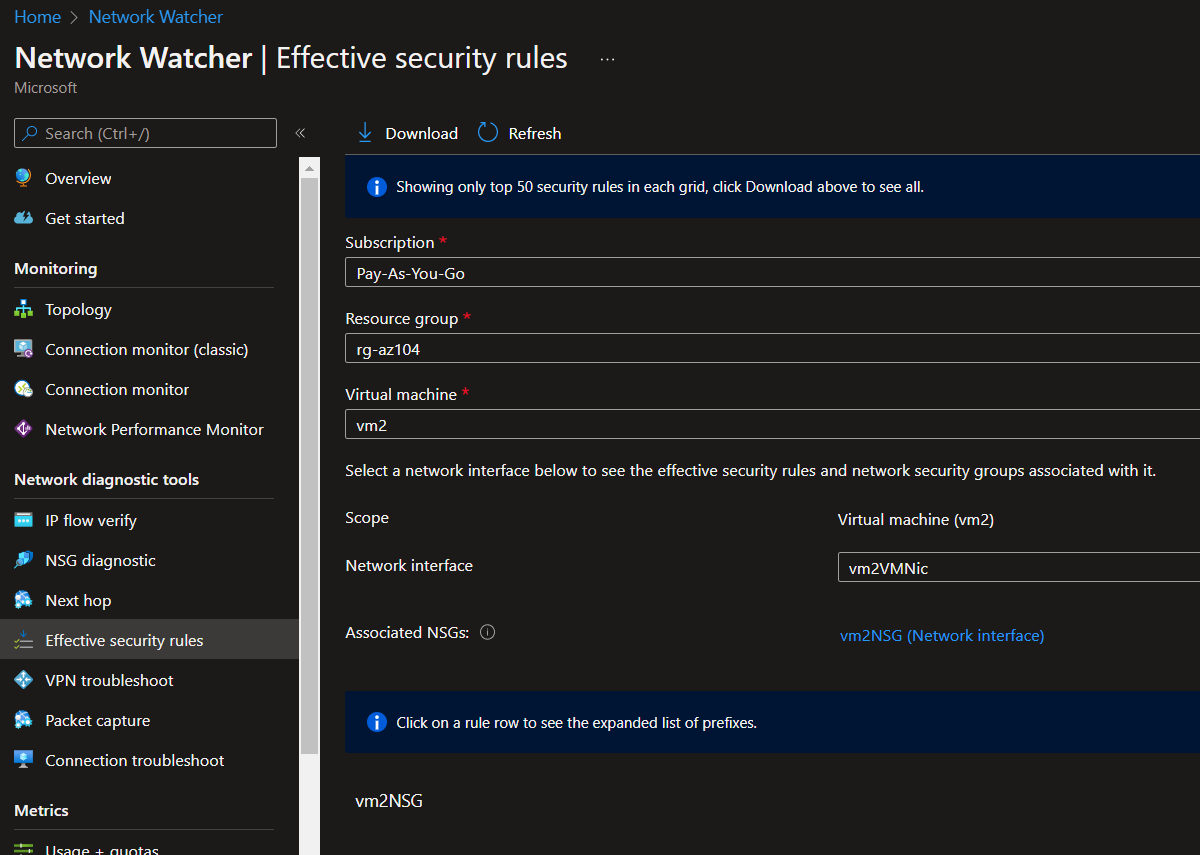
Effective Security Rules
This will display the security rules applied.
VPN Troubleshoot
Network Watcher VPN Troubleshoot diagnoses the health of the virtual network gateway or connection.
TODO: Requires a VPN Gateway for testing
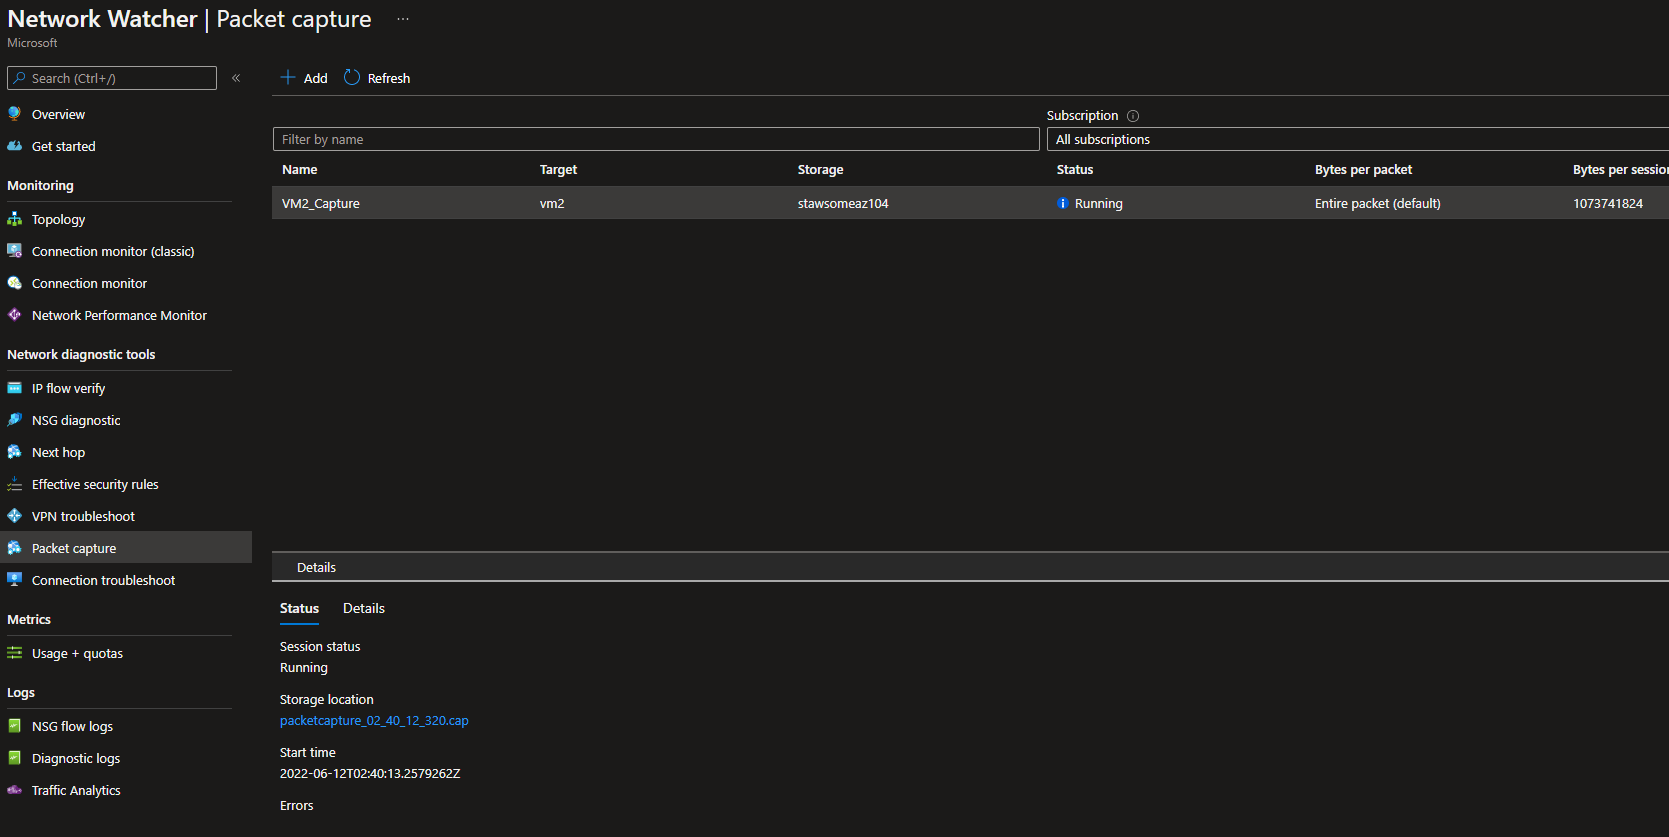
Packet Capture
You’ll need a storage for this.
az storage account create -g 'rg-az104' -n 'stawsomeaz104' --sku 'Standard_LRS'
Now create the package capture:
az network watcher packet-capture create \
  -g 'rg-az104' \
  -n 'VM2_Capture' \
  --vm 'vm2' \
  --storage-account 'stawsomeaz104' \
  --time-limit '3600'
Packets will be written to the storage.
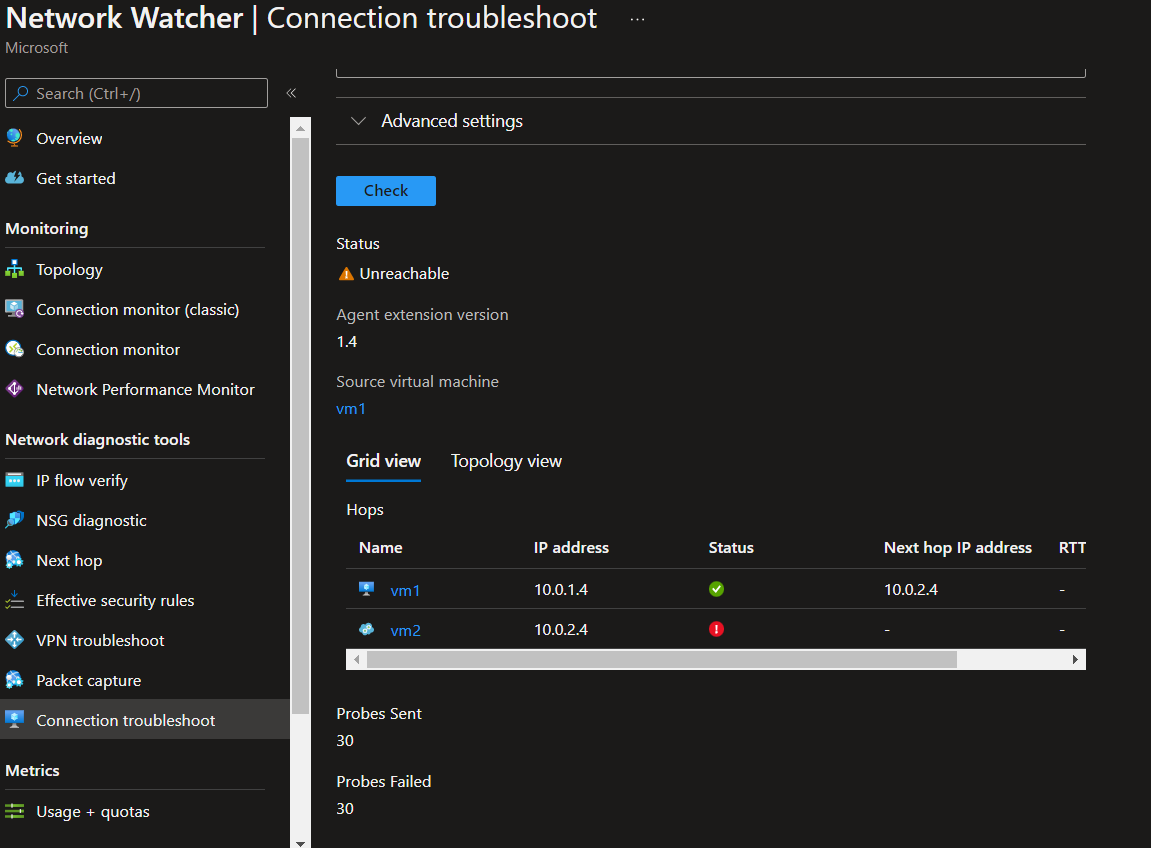
Connection Troubleshoot
Network Watcher Connection Troubleshoot provides the capability to check a direct TCP connection from a virtual machine (VM) to a VM, fully qualified domain name (FQDN), URI, or IPv4 address.
Peering
Example 1 - Not possible
This example demonstrates that it is not possible to do VNET peering between overlapping CIDR addresses.
Based on the follow setup:
az group create -l 'brazilsouth' -n 'rg-az104'

az network vnet create -g 'rg-az104' -n 'VNet1' --address-prefixes '10.11.0.0/16'
az network vnet subnet create -g 'rg-az104' --vnet-name 'VNet1' -n 'internal' --address-prefixes '10.11.0.0/17'

az network vnet create -g 'rg-az104' -n 'VNet2' --address-prefixes '10.11.0.0/17'
az network vnet subnet create -g 'rg-az104' --vnet-name 'VNet1' -n 'internal' --address-prefixes '10.11.0.0/25'
It is not possible to peer the VNETs. This operation will fail.
az network vnet peering create -g 'rg-az104' -n 'peering' \
  --vnet-name 'VNet1' \
  --remote-vnet 'VNet2' \
  --allow-vnet-access
Example 2 - Possible
In this other example it IS possible to peer the VNets:
az network vnet create -g 'rg-az104' -n 'VNet1' --address-prefixes '10.10.10.0/24'

az network vnet create -g 'rg-az104' -n 'VNet2' --address-prefixes '10.10.128.0/17'

az network vnet peering create -g 'rg-az104' -n 'peering' \
  --vnet-name 'VNet1' \
  --remote-vnet 'VNet2' \
  --allow-vnet-access
Recreate Peering
This solution shows what to do when you add an address prefix for VNets already peered.
Considering the initial setup:
az group create -l 'brazilsouth' -n 'rg-az104'

az network vnet create -g 'rg-az104' -n 'VNet1' --address-prefixes '10.1.0.0/16'
az network vnet subnet create -g 'rg-az104' --vnet-name 'VNet1' -n 'MySubnet1' --address-prefixes '10.1.0.0/24'

az network vnet create -g 'rg-az104' -n 'VNet2' --address-prefixes '10.2.0.0/16'
az network vnet subnet create -g 'rg-az104' --vnet-name 'VNet2' -n 'MySubnet2' --address-prefixes '10.2.0.0/24'

az network vnet peering create -g 'rg-az104' -n 'VNet1-to-VNet2' \
  --vnet-name 'VNet1' \
  --remote-vnet 'VNet2' \
  --allow-vnet-access

az network vnet peering create -g 'rg-az104' -n 'VNet2-to-VNet1' \
  --vnet-name 'VNet2' \
  --remote-vnet 'VNet1' \
  --allow-vnet-access
If you try to add a CIDR prefix the request will fail:
Address space of the virtual network {VNET ID} cannot change when virtual network has peerings.
az network vnet update -g 'rg-az104' -n 'VNet1' --address-prefixes '10.1.0.0/16' '10.33.0.0/16'
You need to remove the peering before being able to change VNet1, and re-creating the peerings afterwards.
Reverse DNS
Discover the VM DNS name with reverse DNS.
Create a VM:
az vm create -n 'vm-az104' -g 'rg-az104' --image 'UbuntuLTS' --admin-user 'azureuser' --admin-password 'AwsomeAz104!'
Connect to it and run the command:
dig -x 10.0.0.4 +short
The response will be: vm-az104.internal.cloudapp.net.
Routing Tables
This exercise demonstrate how to implement a route table that routes traffic coming from a VPN Gateway to a specific subnet NVA.

First create the starter infrastructure.
az group create -l 'brazilsouth' -n 'rg-az104'

az network vnet create -g 'rg-az104' -n 'VNet1' --address-prefixes '10.0.0.0/16'

az network vnet subnet create -g 'rg-az104' --vnet-name 'VNet1' -n 'Subnet0' --address-prefixes '10.0.0.0/24'
az network vnet subnet create -g 'rg-az104' --vnet-name 'VNet1' -n 'Subnet1' --address-prefixes '10.0.1.0/24'
az network vnet subnet create -g 'rg-az104' --vnet-name 'VNet1' -n 'Subnet2' --address-prefixes '10.0.2.0/24'
az network vnet subnet create -g 'rg-az104' --vnet-name 'VNet1' -n 'GatewaySubnet' --address-prefixes '10.0.254.0/24'

# This is a simulation of a Router server
az vm create -n 'vm-az104-router' -g 'rg-az104' --image 'UbuntuLTS' --vnet-name 'VNet1' --subnet 'Subnet1'

az network route-table create -g 'rg-az104' -n 'RT'
Now you need to route ALL TRAFFIC where the destination is the very own VNet, and that comes from the Gateway, to be routed to the VM1 router in Subnet1.
# 1 - Create the route for the above requirement
az network route-table route create \
  -g 'rg-az104' \
  -n 'GatewayToNVA_Route' \
  --route-table-name 'RT' \
  --address-prefix '10.0.0.0/16' \
  --next-hop-type 'VirtualAppliance' \
  --next-hop-ip-address '10.0.1.4'

# 2 - Assign it to the Gateway networks
az network vnet subnet update -g 'rg-az104' --vnet-name 'VNet1' -n 'Subnet1' --route-table 'RT'
Virtual Network Policies
This example demonstrates the following behaviors with VNET policies:
- Can’t move resources where the Not Allowed Resource Types match
- Policies do not change resources states once they are created, only compliance alerts
To test it, create the base resources:
terraform init
terraform apply -auto-approve
Once done, try executing the following commands.
You’ll see that both tasks are prohibited by the policy.
# validate / move VNET1 to RG2
vnet1=$(az resource show -g 'RG1' -n 'VNET1' --resource-type "Microsoft.Network/virtualNetworks" --query id --output tsv)
az resource move --destination-group 'RG2' --ids $vnet1

# Change VNET prefix
az vm delete -g 'VNET2' -n 'VM1' --yes
az network vnet subnet delete --name 'internal' --resource-group 'RG2' --vnet-name 'VNET2'
az network vnet update --address-prefixes '40.1.0.0/24' -n 'VNET2' -g 'RG2'
Policies
Policy - Not Allowed Resource Types
The Not Allowed Resources Policy prevents resources to be created according to the scope and exclusion list.
Setup
terraform init
terraform apply -auto-approve
Execute
location='brazilsouth'

# This is allowed
az sql server create -l $location -g 'ContosoRG1' -n 'sql-awsomeaz104-testserver1' -u 'testAdmin' -p 'T3st4dminPazz!999'

# This is NOT allowed
az sql server create -l $location -g 'ContosoRG2' -n 'sql-awsomeaz104-testserver2' -u 'testAdmin' -p 'T3st4dminPazz!999'
Clean up after use:
az sql server delete -g 'ContosoRG1' -n 'sql-awsomeaz104-testserver1' -y
az sql server delete -g 'ContosoRG2' -n 'sql-awsomeaz104-testserver2' -y

terraform destroy -auto-approve
Policy: Apply Tags
This demo has a policy to apply tags to resources.
Rung the demo to see what happens when resources are created.
terraform init
terraform apply -auto-approve
az account show
subid='<....>'
az tag create --resource-id "/subscriptions/$subid/resourcegroups/RG6" --tags RGroup=RG6

az network vnet create -g 'RG6' -n 'VNET2'
Clean up after use:
az network vnet delete -g 'RG6' -n 'VNET2' -y

terraform destroy -auto-approve
Recovery Services Vault
Delete Resources
Demo showing that resources with active backups to Recovery Services vault need to be stopped from the back-up before the RSV can be deleted.
terraform init
terraform apply -auto-approve
At of now only Windows VMs are supported for SQL Server backup-to-VM, and the the Guest Agent must be enabled.
Add the SQL database as a backup to VM in RSV (not available in azurerm provider):
https://docs.microsoft.com/en-us/azure/backup/tutorial-sql-backup
After setting up the backup, try deleting the RSV:
az backup vault delete --name 'rsv-rgv1' --resource-group 'RG26' --yes
Clean up the resources after you finish using them:
terraform destroy -auto-approve
Stop Backup
This example demonstrate that it is necessary to stop VM backups before it is allowed to an RSV to be deleted.
From the documentation:
You can’t delete a Recovery Services vault with any of the following dependencies:
- You can’t delete a vault that contains protected data sources (for example, IaaS VMs, SQL databases, Azure file shares).
- You can’t delete a vault that contains backup data. Once backup data is deleted, it will go into the soft deleted state.
- You can’t delete a vault that contains backup data in the soft deleted state.
- You can’t delete a vault that has registered storage accounts.
To test these requirements:
az group create -n 'rg-az104' -l 'brazilsouth'
az backup vault create -l 'brazilsouth' --name 'rsv-az104' -g 'rg-az104'
az vm create -n 'vm-az104' -g 'rg-az104' --image 'UbuntuLTS'
Enable the backup for the VM:
az backup protection enable-for-vm \
  --resource-group 'rg-az104' \
  --vault-name 'rsv-az104' \
  --vm 'vm-az104' \
  --policy-name DefaultPolicy
Now create the first backup:
az backup protection backup-now \
  --container-name 'iaasvmcontainerv2;rg-az104;vm-az104' \
  --item-name 'vm-az104' \
  --resource-group 'rg-az104' \
  --retain-until '01-02-2025' \
  --vault-name 'rsv-az104' \
  --backup-management-type 'AzureIaasVM'
If you try to delete the RSV it will not be allowed:
az backup vault delete --name 'rsv-az104' -g'rg-az104' --yes
The first step to permit RSV deletion is to stop backup on the items:
az backup protection disable \
  --container-name 'iaasvmcontainerv2;rg-az104;vm-az104' \
  --backup-management-type 'AzureIaasVM' \
  --delete-backup-data false \
  --item-name 'vm-az104' \
  --resource-group 'rg-az104' \
  --vault-name 'rsv-az104' --yes
If backup items exist, they should be unregistered before the RSV can be deleted.
az backup container unregister --container-name 'iaasvmcontainerv2;rg-az104;vm-az104' -g 'rg-az104' --vault-name 'rsv-az104' --backup-management-type 'AzureIaasVM'
Recover Windows Backup
This example will implement the options available when working with backups for both VM and files.
- Options to restore a VM
- Options to restore files from a backed-up VM
az group create -n 'rg-az104' -l 'brazilsouth'
az backup vault create -l 'brazilsouth' --name 'rsv-az104' -g 'rg-az104'

az vm create -n 'vm-az104-win' -g 'rg-az104' \
  --image 'Win2022Datacenter' \
  --admin-user 'azureuser' \
  --admin-password 'AwsomeAz104!'
Enable the VM backup:
az backup protection enable-for-vm \
  --resource-group 'rg-az104' \
  --vault-name 'rsv-az104' \
  --vm 'vm-az104-win' \
  --policy-name 'DefaultPolicy'
Create the first backup:
az backup protection backup-now \
  --container-name 'iaasvmcontainerv2;rg-az104;vm-az104-win' \
  --item-name 'vm-az104-win' \
  --resource-group 'rg-az104' \
  --retain-until '01-02-2025' \
  --vault-name 'rsv-az104' \
  --backup-management-type 'AzureIaasVM'
Upon completion of the backup, two options will be available:
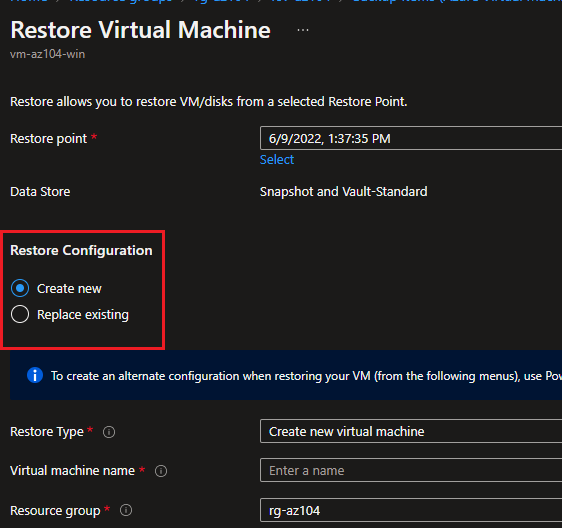
- Restore VM
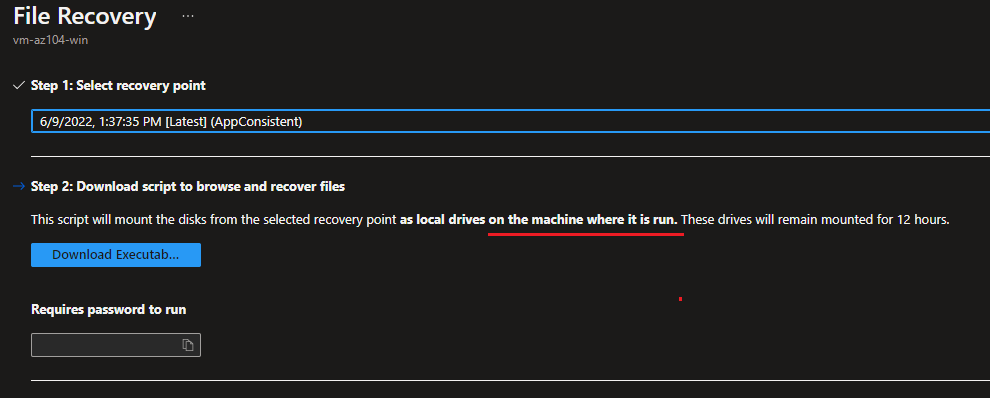
- File Recovery
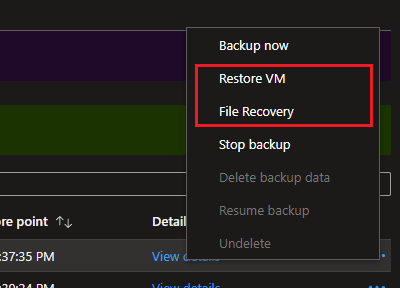
When restoring files, they can be recovered any where that the script is run.
When restoring the VM, it can be either replace existing, or to a new one.
Resource Groups
Resource Locks
Different behaviors when moving resources, varying according to the Lock types.
Create the base resources state:
az group create -n 'RG1' -l 'westeurope'
az group create -n 'RG2' -l 'westeurope'
az group create -n 'RG3' -l 'eastus'

az storage account create -n 'stawsomeaz104' -g 'RG1'

az lock create --name 'Read Only' --resource-group 'RG2' --lock-type 'ReadOnly'
az lock create --name 'Can Not Delete' --resource-group 'RG3' --lock-type 'CanNotDelete'
Try moving the resources:
storage=$(az resource show -g 'RG1' -n 'stawsomeaz104' --resource-type "Microsoft.Storage/storageAccounts" --query id --output tsv)

# No, this will NOT be allowed
az resource move --destination-group 'RG2' --ids $storage

# Yes, this WILL be allowed
az resource move --destination-group 'RG3' --ids $storage
Roles
Custom Role
Exercise to create the following role:
- Can be assigned only to the resource groups in Subscription1
- Prevents the management of the access permissions for the resource groups
- Allows the viewing, creating, modifying, and deleting of resources within the resource groups
Create the role:
# Copy the template
cp sample-cr1.json cr1.json

# Replace the placeholder text with your subscription id
az account show --query 'id' -o tsv

# Create
az role definition create --role-definition '@cr1.json'
Content from sample-cr1.json:
{
  "Name": "CR1",
  "IsCustom": true,
  "Description": "Custom permissions for AZ-104",
  "Actions": [
    "*"
  ],
  "NotActions": [
    "Microsoft.Authorization/*"
  ],
  "AssignableScopes": [
    "/subscriptions/{subscriptionId}"
  ]
}
Clean up after:
az role definition delete -n 'CR1'
Virtual Machines
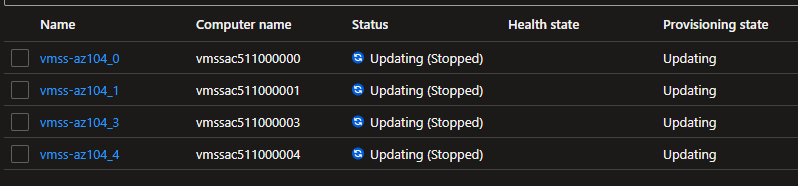
Change VMSS Size
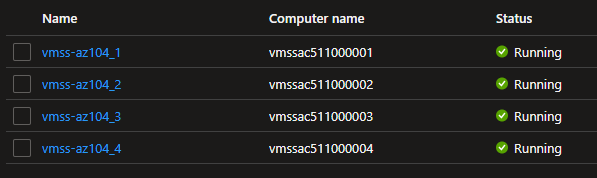
When changing a Scale Set VM size, all VMs will restart at the same time.
az vmss create \
  -n 'vmss-az104' \
  -g 'rg-az104' \
  --instance-count 4 \
  --image 'UbuntuLTS' \
  --admin-username 'azureuser' \
  --admin-password 'SecretPassAz104!' \
  --vm-sku 'Standard_B1s' \
  --enable-auto-update 'true' \
  --upgrade-policy-mode 'Automatic'
Once created all VM’s will be in a running state:
Now change the size:
az vmss update -n 'vmss-az104' -g 'rg-az104' --vm-sku 'Standard_B1ms'
All VMs will be upgraded automatically at the same time.
Extension Profile
As demonstrated by the existing azuredeploy_v2 example, to deploy a Scale Set for Windows machines while having the possibility to add apps such as Web components:
- Upload the script file
- Modify the
extensionProfilein the ARM template
Snippet from Microsoft documentation:
"extensionProfile": {
  "extensions": [
    {
      "name": "AppInstall",
      "properties": {
        "publisher": "Microsoft.Azure.Extensions",
        "type": "CustomScript",
        "typeHandlerVersion": "2.0",
        "autoUpgradeMinorVersion": true,
        "settings": {
          "fileUris": [
            "https://raw.githubusercontent.com/Azure-Samples/compute-automation-configurations/master/automate_nginx_v2.sh"
          ],
          "commandToExecute": "bash automate_nginx_v2.sh"
        }
      }
    }
  ]
}
These can also be configured using Azure CLI:
az vmss extension set --vmss-name my-vmss --name customScript --resource-group my-group \
  --version 2.0 --publisher Microsoft.Azure.Extensions \
  --provision-after-extensions NetworkWatcherAgentLinux VMAccessForLinux  \
  --settings '{"commandToExecute": "echo testing"}'
Provision Scale Set with cloud-init
Simply add a file via --custom-data with the custom code:
az vmss create \
  -n 'vmss-az104' \
  -g 'rg-az104' \
  --instance-count 1 \
  --image 'Win2022Datacenter' \
  --custom-data @clout-init.txt \
  --admin-username 'azureuser' \
  --admin-password 'SecretPassAz104!' \
  --public-ip-per-vm
Example with cloud-init:
<powershell>
$root = $env:SystemDrive
New-Item -path "$root\NewFile.txt"
</powershell>
Storage Accounts
Create a container with azcopy
Use the make option in azcopy to create a container.
az group create -n 'rg-azcopy-vmimage' -l 'brazilsouth'
az storage account create -n 'stawsomeaz104' -g 'rg-azcopy-vmimage'

end=`date -u -d "60 minutes" '+%Y-%m-%dT%H:%MZ'`
az storage account generate-sas --permissions 'acdfilprrtuwxy' --account-name 'stawsomeaz104' --services 'b' --resource-types 'sco' --expiry $end -o tsv
Using PowerShell:
.\azcopy.exe make "https://stawsomeaz104.blob.core.windows.net/vmimages?$token"
On-premises azcopy
You need to copy contents of a local folder D:\folder1 to a public container an Azure Storage account.
Create the test resources:
az group create -n 'rg-azcopy' -l 'brazilsouth'
az storage account create -n 'stawsomeaz104' -g 'rg-azcopy' -l 'brazilsouth'
az storage container create -n 'public' --account-name 'stawsomeaz104' --public-access 'container'
Create the SAS token:
end=`date -u -d "60 minutes" '+%Y-%m-%dT%H:%MZ'`

az storage account generate-sas --permissions 'acdfilprrtuwxy' --account-name 'stawsomeaz104' --services 'b' --resource-types 'sco' --expiry $end -o tsv
Create the test files (here in Windows):
ni folder1/file1.txt -Force
ni folder1/folder2/file2.txt -Force
Copy the files:
$token='<SAS Token>'

.\azcopy.exe copy "folder1" "https://stawsomeaz104.blob.core.windows.net/public?$token" --recursive
Destroy the resources after use:
az group delete -n 'rg-azcopy' -y
File Sync
Sync File Share to On-Premises Server
This exercise will demonstrate the correct steps to Sync files from a cloud share to an on-premises server.
First create the base infrastructure required for the exercise, and then move to the steps required for the configuration of the file sync.
Create the Base resources
The Storage Sync Service and the File Share resources must be in the same region.
Create the File Share:
az group create -n 'rg-sync' -l 'brazilsouth'
az storage account create -n 'stawsomeaz104sync' -g 'rg-sync'
az storage share create --account-name 'stawsomeaz104sync' --name 'data'
Create the Storage Sync Service:
az storagesync create -g 'rg-sync' -n 'sync-awsomeaz104' -l "brazilsouth"
Create the Server VM:
az vm create \
    -g 'rg-sync' \
    -n'vm-sync' \
    --image 'Win2022Datacenter' \
    --public-ip-sku 'Standard' \
    --admin-username 'azureuser' \
    --admin-password 'SecretPassAz104!'
Configure the Sync
This configuration required:
- Storage Account with a file share
- Storage Sync Service
- A Windows machine to run the File Sync Agent
Assuming you followed the steps above this should be ready.
Step 1 - Install the Agent in the Server
Connect to the VM using RDP and vm-sync\azureuser and then install the agent.
Step 2 - Register the Server to the Storage Sync Service
Follow these steps for registration.
Step 3 - Step Create the Sync Group
az storagesync sync-group create \
  -g 'rg-sync' \
  --storage-sync-service 'sync-awsomeaz104' \
  --name 'SampleSyncGroup'
Step 4 - Add Cloud Endpoint
The Cloud Endpoint must be added before the Server Endpoint
az storagesync sync-group cloud-endpoint create \
  --resource-group 'rg-sync' \
  --storage-sync-service 'sync-awsomeaz104' \
  --sync-group-name 'SampleSyncGroup' \
  --name "SampleCloudEndpoint" \
  --storage-account 'sync-awsomeaz104' \
  --azure-file-share-name 'data'
Step 5 - Add Server Endpoint
az storagesync registered-server list --resource-group 'rg-sync' --storage-sync-service 'sync-awsomeaz104'

registeredServerId='<....>'

az storagesync sync-group server-endpoint create \
  --resource-group 'rg-sync' \
  --storage-sync-service 'sync-awsomeaz104' \
  --sync-group-name 'SampleSyncGroup' \
  --name 'SampleServerEndpoint' \
  --server-id $registeredServerId \
  --server-local-path "c:\abc"
You may wish to setup additional options for the Server Endpoint
  --cloud-tiering "off"
  --volume-free-space-percent 80
  --tier-files-older-than-days 20 \
  --offline-data-transfer "on"
  --offline-data-transfer-share-name "myfileshare"
Virtual Machines
ARM Template
Create a VM using ARM template for both PowerShell and Azure CLI.
Create the Resource Group
For this example you create the resource group separately (or reuse one you have).
# PowerShell
Connect-AzAccount
New-AzResourceGroup -Name "rg-vm"-Location "brazilsouth"
# Azure CLI
az login
az group create --name "rg-vm" --location "brazilsouth"
Create the Group Deployment
# PowerShell
New-AzResourceGroupDeployment `
  -Name DeployLocalTemplate `
  -ResourceGroupName "rg-vm" `
  -TemplateFile "@azuredeploy.json" `
  -TemplateParameterFile '@azuredeploy-parameters.json'
  -verbose
# Azure CLI
az deployment group create \
  --name DeployLocalTemplate \
  --resource-group 'rg-vm' \
  --template-file '@azuredeploy.json' \
  --parameters '@azuredeploy-parameters.json'
  --verbose
Monitor Metrics and Logs of Linux VM
Monitoring of Metrics and Logs in a Linux VM can be performed by installing the Linux Diagnostic Extension (LAD 4.0).
az vm create -n 'vm-az104' -g 'rg-az104' --image 'UbuntuLTS'
az storage account create -n 'stawsomeaz104' -g 'rg-az104' --sku 'Standard_LRS'
As demonstrated in the documentation:
az vm extension set \
  --publisher Microsoft.Azure.Diagnostics \
  --name LinuxDiagnostic \
  --version 4.0 \
  --resource-group 'rg-az104' \
  --vm-name 'vm-az104' \
  --protected-settings ProtectedSettings.json